

What Cap To Use On Toilet Valves Until They're Repaired
The toilet is i of the most important fixtures in your home. Although toilets are sturdy and reliable components of the plumbing system, it's a rare homeowner or apartment-dweller who never has whatever problems with a toilet. Clogging is perhaps the nigh common toilet problem, merely it is far from the only one. The tank, for case, can make all sorts of strange noises, or water can run continuously. Fortunately, most toilet troubles tin be stock-still by a practise-information technology-yourself plumber.
If you lot're a exercise-it-yourself kind of person, learning some quick fixes can keep you from calling the plumber. In this article, we're going to explain various issues related to repairing toilets.
Replacing a Toilet Seat
The easiest toilet repair task is replacing the lid and seat. At that place are so many styles of replacement seats bachelor that you lot should have no trouble finding one to match any bath color scheme or motif. Most modern toilets are manufactured in 2 standard sizes, and replacement seats are made to fit them.
Once y'all have the right size seat, remove the quondam one. Remove the ii nuts on the hinge and lift your old toilet seat up and out. A common trouble is that the nuts securing the toilet seat may be rusted or corroded. The nuts on some toilet seats are recessed and practically inaccessible, making the task even more difficult.
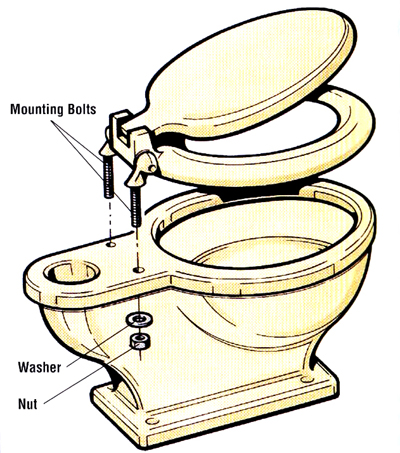
A new toilet seat can be installed by inserting the two bolts, slipping on the washers, and tightening the basics. Be careful non to over-tighten the nuts or the seat might be hard to remove after.
What's the solution? If yous tin can become to the fasteners relatively easily, use some penetrating oil to help loosen them. Give the oil plenty of time to soak in. Use a wrench, or, if you lot tin can't reach the basics with a regular wrench, a deep socket wrench. Be certain you don't use as well much force; if the wrench slips off a stubborn nut, it could strike and crevice the tank of the bowl or annihilation else it happens to hit.
| Sink, Tub and Drain Troubleshooting Guide | ||
| Trouble | Possible Cause | Solution |
| Water in tank runs constantly | Float ball or rod is misaligned. | Bend bladder rod carefully to move ball so it will not rub against side of tank. |
| Float ball contains water. | Empty or replace float ball. | |
| Bladder brawl non rising loftier plenty. | Advisedly bend float rod downwards, but only slightly. | |
| Tank brawl not sealing properly at bottom of tank. | Remove any corrosion from lip of valve seat. Replace tank ball if worn. Conform elevator wire and guide. | |
| Ballcock valve does not shut off water. | Supersede washers in ballcock associates or, if necessary, replace entire assembly. | |
| Toilet does not affluent or flushes inadequately | Drain is chock-full. | Remove blockage in drain. |
| Not enough water in tank. | Raise water in tank by bending float rod up slightly. | |
| Tank ball falls back before enough water leaves tank. | Movement guide up and then tank ball can ascension higher. | |
| Leak where tank joins toilet bowl. | Tighten nuts on spud pipe; supercede white potato washers, if necessary. | |
| Ports effectually bowl rim clogged. | Ream out rest from ports. | |
| Tank whines while filling | Ballcock valve non operating properly. | Supercede washers or install new ballcock assembly |
| Waster supply is restricted. | Check shutoff to make certain it's completely open. Check for scale or corrosion at entry into tank on valve. | |
| Moisture effectually fixture | Condensation. | Install foam liner, tank embrace, drip catcher or temperature valve. |
| Leak at flange wax seal. | Remove toilet and install new wax ring seal. | |
| Leak at bowl-tank connection. | Tighten spud pipe basics; replace worn spud washers, if necessary. | |
| Leak at water inlet connectedness. | Tighten locknut and coupling nut; replace washers and gasket, if necessary. | |
| Crack in bowl or tank. | Replace bowl, tank, or unabridged fixture. | |
If all else fails, yous'll have to cut off the bolts with a hacksaw. To protect the bowl'southward finish, employ tape to the basin at the spots the hacksaw bract is probable to rub against. Then insert the blade nether the hinge, and saw through the bolts. Be extremely cautious in using the saw—a devil-may-care slip with a hacksaw can crack the fixture only as easily as a blow with a wrench.
With the nuts removed or the bolts cut, you lot can remove the old seat without farther difficulty. Clean the area earlier installing the new seat. The new on tin can be installed by inserting the bolts and tightening the nuts. Exist careful non to over-tighten the basics, equally you may want to replace this seat anytime every bit well. If y'all live in a rented flat and install a new seat that you paid for yourself, be sure to keep the old i. When you're ready to exit, you lot can replace the new on with the original and take the new seat with y'all.
If the toilet lid and seat are still in good condition, only the small rubber bumpers on the bottom are in bad shape, yous can buy replacement bumpers at the hardware shop. Some bumpers screw in; others must be nailed or glued into place. Whichever type you lot have, try to install the new ones in holes that are close plenty to conceal the original holes.
Clearing a Clogged Toilet
You tin by and large articulate a chock-full toilet with a plunger, otherwise known as the plumbers' friend. Make certain that at that place'south enough water in the toilet bowl to cover the rubber suction cup, then work the handle of the plunger up and downwardly. If there isn't enough water in the bowl, exercise not flush the toilet; flushing a clogged toilet will just cause the bowl to overflow. Instead, bring a pan or pot of water from another source to supply the h2o you need to encompass the plunger cup. There are two types of plungers, and the one with a bulb-type head is especially effective for toilets. Some types have a fold-out caput that's designed for toilet utilize.
Usually, whatever is blocking the toilet drain is not very far away. If the plunger'south activity doesn't dislodge the clog, you can endeavor to hook the blockage and pull it free. A wire coat hanger can sometimes exercise the job, but it is really a substitute for the closet or toilet auger.
![]()
Earlier using the plunger, make sure there'southward enough water in the toilet bowl to cover the suction cup. Pump the plunger to dislodge the clog.
The auger has a long sleeve or tube to guide the ophidian and auger hook into the trap. A crank on the end enables you to turn the hook in the drain or trap. Here's how to employ it.
Step 1: Insert the auger into the toilet trap and turn the crank until it feels tight. This means that the snake has twisted its way to and into the blockage.
Step 2: When you pull in the auger, you should be able to remove whatsoever is clogging the toilet. If you aren't successful, try the closet auger several more times. In some cases, you may take to resort to pushing a regular plumbers' ophidian through the blockage.
Step 3: When all else fails, the toilet may have to be removed from the floor and turned upside down and then you lot tin can get a blockage. This is not what anyone would phone call an easy chore, so you should give the simpler methods as proficient a try as yous tin before you lot remove the toilet. But removing the toilet is not beyond the capabilities of the boilerplate do-information technology-yourselfer, and this procedure is explained in the forthcoming section.
![]()
The cupboard auger has a long sleeve to guide the snake and auger hook into the trap. A crank enables you to plow the hook and dislodge the blockage.
Toilet Tank Problems
Compared with a clogged toilet, tank troubles tin can seem relatively insignificant. Yet foreign noises or continuous water running can be more than than annoying. They can also exist costing you coin in wasted water. Fortunately, y'all can eliminate almost tank troubles quickly and hands.

Toilet tank troubles are both common and abrasive, and they could be costing you money in wasted water. Nigh problems, however, tin can be eliminated quickly and hands. This is a cross department of a typical toilet tank and its components.
In one case you know how the toilet works, you tin start to look for the source of toilet tank problems. Elevator the lid off your toilet tank, and you should be able to follow this procedure quite easily.
When y'all trip the handle on the tank to flush a toilet, a trip lever is raised inside the tank. This lever lifts wires, which, in turn, heighten the tank brawl or rubber flap at the lesser of the tank. When the flush valve opening is clear, the h2o in the tank rushes out by the raised tank ball and into the toilet bowl below. This raises the level of water in the bowl higher up the level of water in the toilet trap.
While the water is rushing out of the tank, the float ball, which floats on top of the water in the tank, drops down. This pulls down on the float arm, raising the valve plunger in the ballcock assembly and allowing fresh water to menses into the tank. Since water seeks its own level, the h2o from the tank pushes the bowl water out into the bleed, causing a siphoning action that cleans everything out of the bowl. When all the h2o is gone from the toilet bowl and air is fatigued into the trap, the siphoning stops. Meanwhile, the tank brawl falls back into identify, closing the flush valve opening.
Every bit the h2o level rises in the tank, the float ball rises until the float arm is high enough to lower the valve plunger in the ballcock assembly and shut off the incoming water. If the h2o fails to shut off there is an overflow tube that carries backlog water downward into the basin to prevent the tank from overflowing. If h2o flows continuously out of the tank to the bowl and downward the drain:
Footstep 1: Lift upward on the float arm. If the h2o stops, y'all know the trouble is that the bladder ball doesn't rise far enough to lower the valve plunger in the ballcock assembly. Ane reason could be that the bladder ball is rubbing against the side of the tank. If this is the example, bend the float arm slightly to move the brawl away from the tank side.

If your toilet runs continuously, check the guide and lift wire that raises and lowers the tank ball to be sure they are aligned properly.
Step ii: If the ball doesn't touch the tank, continue to hold the bladder arm and remove the ball from the cease of the arm by turning information technology counterclockwise. Then milk shake the ball to run into if there'south water inside information technology, as the weight of the h2o inside could exist preventing the brawl from rise normally. If in that location is water in the brawl, milkshake information technology out and put the ball dorsum on the float arm. If the ball is damaged or corroded, supersede it with a new one. If there is no water in the ball, put the ball back on and gently curve the bladder rod down to lower the level the bladder ball must reach to shut off the flow of fresh water into the tank.
Step 3: If the above steps don't solve the problem, check the tank ball at the flush valve seat. Chemic remainder from the water can prevent this ball from seating properly, or the ball itself may have decayed. Water volition seep through the flush valve opening into the toilet bowl below. Turn off the h2o at the toilet shutoff valve and flush the toilet to empty the tank. You can now examine the tank ball for signs of wear and examine the tank ball for signs of wear and install a new ball if necessary. If the problem is chemic residual on the lip of the flush valve opening, take some moisture-dry emery fabric, steel wool, or even a knife and make clean away the droppings.
Step four: If the excess water even so flows through the toilet, the guide or the lift wire that raises and lowers the tank ball may be out of the line or bent. Make sure the guide is in place so that the wire is directly above the flush valve opening. Rotate the guide until the tank ball falls straight downward into the opening. If a elevator wire is bent, try to bend information technology dorsum to the correct position, or install a new i. Brand sure the trip lever rod is not rubbing against annihilation and the elevator wire is not installed in the wrong hole of the rod; either situation could cause the tank ball to fall at an angle and non block the opening equally it should.
If neither the float ball not the tank brawl is at fault, and then the trouble must be in the ballcock associates.
Fixing a Toilet Ballcock Associates
The ballcock assembly looks more complicated than it really is. When y'all go to a hardware or plumbing-supply shop to purchase a new ballcock assembly, you'll detect that both plastic and metal units are available. Plastic costs less and will not corrode. Just plastic assemblies are not as sturdy as metal ones. In addition, plastic units ordinarily cannot be repaired considering many of them are sealed. Nevertheless, you tin purchase a blazon of unit different from the one you're replacing as long as the new assembly has a threaded shank the same size every bit the former 1. If possible, bring the erstwhile assembly with you when you to buy the replacement. Here's how to fix an older-style ballcock assembly:
Step 1: Make sure the water shutoff valve for the toilet is in the OFF position.

On many older ballcock assemblies, a pair of thumbscrews holds the valve plunger. You will have to unscrew them to remove the valve.
Step two: Remove the valve plunger, and y'all'll come across on or two washers or O-rings. If any of these parts is faulty, water volition flow out past the plunger continuously, and the toilet volition run constantly. Examine all of the washers and supplant whatsoever defective ones.
Step 3: If the ballcock assembly is sealed, replace it every bit a unit. Shut off the toilet water supply at the shutoff valve and affluent the tank. Unscrew the float arm from the quondam ballcock unit and remove the refill tube from the overflow tube.
Step 4: Look under the tank for a coupling or slip nut where the water inlet pipe enters the base of the tank. Loosen the coupling nut to free the water inlet piping. Then use an adaptable wrench to grip the retaining nut or locknut immediately above the sip nut under the tank. Utilize another wrench to grip the base of operations of the ballcock assembly shaft inside the tank.
Step v: Unscrew the locknut under the tank to remove the ballcock associates. If the nut is stubborn, use penetrating oil to loosen it.
Step 6: Life the former assembly out of the tank, saving the washers from all connections, both inside and outside the tank. New ones will probably be included with the replacement unit, merely keep the old parts until you lot've installed the new ballcock assembly in case new parts are damaged during installation.

When installing a new ballcock assembly, make certain the gasket and the washer are properly seated and firmly secured by the retaining unit.
Step 7: Insert the new ballcock assembly into the pigsty in the tank. With the within washer in place, tighten the locknut on the outside sufficiently to make the inside washer fit watertight against the hole, but don't over-tighten information technology.
Stride viii: Supercede the coupling nut and water inlet pipe, reinstall the bladder arm, and set the refill tube into the overflow tube.
Step nine: Turn the water back on at the toilet shutoff valve and check for leaks at all points. Of course, another matter to check is that the float ball does not rub confronting the back of the tank.
Newer types of ballcock assemblies eliminate the float arm and the float ball. One kind features a plastic loving cup that floats up to cutting off the h2o as the tank fills. You can set the h2o level in the tank by adjusting the position of the plastic loving cup on a pull rod. 1 advantage to this type of ballcock associates is that it lets the water run total-strength until the tank is filled. It then shuts the water off immediately, eliminating the groaning noises some toilets make as a float arm gradually closes the valve.

One type of diaphragm-powered valve rests close to the bottom of the tank (left); information technology eliminates the float ball and float arm. Another type (right) uses a flapper cover, lifted by a chain.
Some other type of ballcock also eliminates the float ball and bladder arm. This is a small unit that rests almost on the bottom of the tank; it's diaphragm-powered valve senses the level of the water from down at that place. Moreover, since information technology requires no tools, this assembly is an easy unit to install. To install these newer ballcock assemblies:
Step 1: Turn off the tank'due south water supply shutoff valve. Then flush the toilet to bleed the tank. Sponge up whatever water remaining in the tank before proceeding.
Stride 2: Remove the old ballcock assembly, following the process outlined higher up. Skid the parts over the water inlet pipe under the tank in this society: coupling nut, friction washer, cone washer, and retaining or mounting nut.
Step 3: Install the new unit of measurement within the tank, plumbing equipment the threaded shank down through the hole over the h2o supply pipe and making sure the gasket fits into the hole. Commencement tightening the retaining or the mounting nut nether the tank onto the threaded shank: hand-tighten it only. Push the washers into place and mitt-tighten the coupling nut under tank; exist careful non to over-tighten it.
Step 4: Inside the tank, adhere one end of the refill tube to the tank'due south overflow pipe and place the other stop on the stem of the replacement unit.
Pace 5: Open the water supply valve to fill the tank. The h2o level in the tank can exist adapted by a knob on the new valve unit.
Solving Common Toilet Problems
What tin can you do if as well little water comes from the tank to flush the toilet bowl clean?
Stride 1: Bank check the h2o level in the tank. Information technology'due south probably besides low. If the water level doesn't achieve within 1 ½ inches of the top of the overflow tube, bend the float arm upwards slightly to let more than h2o enter the tank.
Footstep 2: If the h2o level is correct only there's still non enough h2o coming from the tank to make clean the basin properly, the problem may be the tank ball on the affluent valve seat the lesser of the tank. The brawl is probably dropping also presently because the guide is gear up too low. Heighten the guide, just make sure information technology stays in line with the elevator wire. If the guide and the wire are out of alignment, the tank ball will not drop straight into the valve seat opening, and the toilet will run continuously.
Stride 3: Expect for other crusade of inadequate flushing. The small ports around the underside of the toilet basin's rim tin get clogged with residue from chemicals in the h2o and forbid a sufficient amount of tank water from running out into the bowl. A small mirror tin can help yous examine the holes, and a piece of wire coat hanger or an beginning Phillips screwdriver—if i is available—tin ream out any clogged droppings.
Here's another common problem amongst toilets. Toilet tanks tin sweat and baste onto your floors simply as the pipes tin can. There are jackets designed specifically to fit over the tank and absorb the moisture. There are besides drip pans that fit under the tank to catch the dripping condensation and so that information technology doesn't impairment your bathroom floor. A device called a temperator valve is another way to combat tank sweating. The valve provides a regulated mixture of hot and cold water, which lessens the deviation between the temperature inside the tank and the temperature of the surrounding air. Information technology is this difference in temperature that causes condensation, or sweating. Consider installing a temperator valve if the h2o in the tank is usually below 50 degrees Fahrenheit.

The temperator valve, which requires both hot-water and cold-water supply connections, can reduce toilet tank sweating.
A temperator valve requires yous to claw upwards a hot-water line to the valve, which may be quite inconvenient if in that location is no such line relatively close to the toilet. Moreover, the temperator valve does not prevent the water within the tank from cooling between flushings: thus, condensation can still occur fifty-fifty on a temperator-equipped toilet. A leak may be due to loose connections or defective washers on the spud pipe or where the h2o inlet pipe and ballcock assembly are attached to the tank. Replace whatever worn gaskets or washers and tighten all of the nuts, then examination with bluing in the h2o.
Information technology is too possible that water is seeping out from under the toilet basin. The wax ring seal that joins the basin to the drain outlet may be defective. If this is the case, the bowl must exist removed, and a new gasket installed. If the leak is due to a cleft in the tank or basin, the whole toilet must exist replaced.
Replacing a Toilet
Removing and replacing a toilet is not a task to be undertaken without practiced reason, but it is certainly not beyond your capabilities. When you can't unclog the toilet by less drastic means, removing it is the answer. Peradventure you want a more modern toilet, maybe the basin or the tank is cracked, or maybe the fixture leaks around its base. All of these situations telephone call for removing and reinstalling the erstwhile toilet or installing a new fixture.
Although there's nothing difficult about removing and replacing a toilet, local plumbing code may prohibit anyone simply a licensed plumber from doing the job. Cheque the lawmaking for your community to make certain it is okay for you to undertake the task. To replace a toilet:
Step 1: Measure the rough-in distance—the distance from the wall backside the basin to the eye of the toilet flooring drain. Measure out from the wall to the center of either of the 2 hold-down bolts, one on each side of the toilet, that hold the fixture to the floor. If there are two bolts on each side, measure to the center of the rear commodities.
Stride 2: Select the replacement toilet unit of measurement using the crude-in distance and so that it will fit properly in your bathroom. You tin replace your sometime toilet with a more modern fixture, but yous must make sure that the new unit of measurement will fit into the space betwixt the drainpipe and the wall. You can install a smaller unit, only you cannot put a larger toilet into a space that was occupied past a smaller fixture.
Step 3: Shut off the water supply to the toilet tank, and so remove all the water from both the tank and the bowl. Trip the flush handle to eliminate most of the h2o from the tank. Then soak upward whatever water is left with a sponge. Bail out the water in the bowl with a small container, and then apply a sponge to dry out the bowl completely.
Step four: If the tank is connected to the wall, remove the hanger bolts inside the tank that secure the tank to the wall. So remove the pair of bolts at the bottom of the tank that connect the tank to the bowl. Remove the tank and ready it out of the way.
Step 5: Remove the caps over the concord-down bolts at the base of the bowl if there whatsoever. Virtually of these caps are made of ceramic to match the basin. Some types are held on by plumbers' join chemical compound and can be pried off with a putty knife; others are threaded and can exist unscrewed. Later removing the caps, castor away the stale compound before proceeding.
Stride vi: Remove the agree-downwardly nuts or bolts. These may be extremely stubborn, but some penetrating oil should make removal much easier. Save the washers and bolts if you lot will be reinstalling the bowl. Once the hold-down nuts or bolts are out, there's zero else belongings the basin to the floor. Circumspection: To foreclose sewer gas from backing up the drain, you should plug the opening while you work. Tie a cord around an old towel so it won't fall through the opening, and jam this plug into the drain.
Step 7: Remove the basin. Because the bowl and the tank tin crack from merely ane sharp blow to the porcelain, spread out an old slice of carpeting on which yous tin lay the fixtures. You should as well accept a saucepan and sponge handy to soak up the water yous couldn't bail out earlier. With your work surface prepared, rock the bowl gently back and along to loosen it, and and so lift it straight up. It weights almost 60 or lxx pounds. Set the basin on the piece of carpet.
Stride 8: Inspect the uncovered drain. If necessary, clear the drain. Once the pipe is clear, you can proceed with the replacement of the toilet.
Step ix: Putting in a new toilet and reinstalling the old one are washed in the same way. With a putty knife, scrape away all the old putty or other sealing material from both the bottom of the basin and the floor flange.

Typical installing of a two-piece floor-mounted toilet.

The crude-in distance tin be measured with the toilet in place past measuring from the wall to the center of the concur-down commodities, or to the center of the rear commodities if the fixture is held by ii pairs of bolts.
Inspect the flooring where the toilet was. If the floor has rotted, information technology will have to exist rebuilt earlier the toilet can be installed. Depending on how bad the impairment is, the rebuilding may involve the floor, the subfloor, and even the joists. In this case, have a carpenter rebuilt the damaged area earlier you install the toilet. Also inspect the flange and the bolts that come up upwardly from the flange. If the flange is damaged or the bolts are stripped, replace the faulty part of parts before yous become any farther.
Step 10: Install a new sealer ring on the h2o outlet opening on the lesser of the new bowl. With the fixture upside down, gear up the sealer ring into place on the bottom of the basin. If the flooring flange is recessed, yous'll need a gasket with a plastic sleeve in the ring. This sleeve should face toward y'all as you position it, since information technology will get into the soil pipe.
Footstep 11: Apply a compatible layer of the toilet-bowl setting compound about 2 one/8 inch thick effectually the edge of the bowl at the base. This compound is available at hardware stores and plumbing-supply stores.
Step 12: Remove the plug from the drain or soil pipe. Turn the bowl right side upwardly and identify it downwards over the flange, guiding the bolts into place. Printing down firmly, and give the bowl a slight twist to make certain the wax band seats properly against the flange. Place a level across the bowl to make certain that it is level. Move the bowl equally needed to level it, simply don't disturb or break the seal of the wax ring or the toilet will leak.
Pace thirteen: Paw-tighten the basics to concur the bowl to the floor. Do non over-tighten the nuts, or else the fixture may crevice. Coat the hold-down nuts and bolts with toilet bowl setting chemical compound and reinstall the caps.
Pace 14: If the tank and basin are separate fixtures, you lot should now attach the tank. Rebolt a wall-mounted tank, or reinstall the bolts and washers that connect a bowl-supported tank. Supplant whatever damaged parts. If the tank and bowl are connected with spud pipe, employ pipage joint compound to the threads of the white potato slip basics and tighten them in place.
Step 15: Reconnect the water supply inlet pipage to the tan, make sure the ballcock assembly is properly fastened, and plough the h2o back on.
Lots More Information

What Cap To Use On Toilet Valves Until They're Repaired,
Source: https://home.howstuffworks.com/home-improvement/plumbing/how-to-repair-a-toilet.htm
Posted by: harrismitte1993.blogspot.com
0 Response to "What Cap To Use On Toilet Valves Until They're Repaired"
Post a Comment